Vests – or “slipovers” if you’re feeling fancy – are having a major moment. They are the ultimate layering piece – you can throw them over a white button-down for a preppy look or wear a chunky one over a tee for peak cozy vibes. If you’re a knitter, vests are basically a superpower. They have no sleeves, which means they knit up twice as fast as a sweater and you don’t have to worry about the dreaded “sleeve island.”
In this post, we’re breaking down the best free patterns out there. Plus, we’ve got all the tips you need to actually finish your project and love how it looks.
Why Vests Are Perfect for Beginners
If you’ve only ever knitted scarves, a vest is the perfect next step. Here is why:
- No Sleeves: This is the big one. Shaping sleeves and sewing them on can be a nightmare for your first garment. Vests skip that entirely.
- Small Commitment: You’ll use less yarn than a full sweater. This makes it cheaper and faster.
- Skill Builder: You’ll learn how to shape armholes and necklines without being overwhelmed by a massive project.
How to Choose the Right Pattern
Not all vests are created equal. Before you hit “download” on that free PDF, think about what you actually like to wear.
Consider the Fit
Do you like a cropped, tight look? Or are you more into the “stole this from my grandpa” oversized vibe? Look at the positive ease mentioned in the pattern. Positive ease just means how much bigger the finished garment is than your actual body. If you want it baggy, look for at least 4-6 inches of positive ease.
Check the Construction
Some vests are knit in the round (like a big tube). Others are knit in flat pieces (a front and a back) and then sewed together.
- In the round: No sewing! But you might need circular needles.
- Flat: Easier to keep track of your rows, but you’ll have to learn the mattress stitch to join the sides.
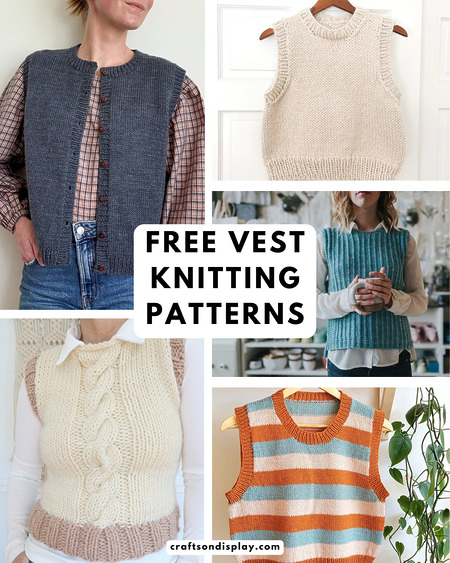
The Best Free Patterns to Try Right Now
The “Everyday” Basic Vest
Look for patterns that use Worsted or DK weight yarn. These are mid-weight and very versatile. You’ll find lots of free “basic” slipover patterns that use simple stockinette stitch. These are great because they go with everything.
- See My Vest – Worsted weight yarn, free pattern by Emily Bolduan
- Carina Slipover, free pattern by Cookie the Knitter
- Sally Vest, free pattern by Annabel Williams
- Waterrock, free pattern by Jennifer Kelley
The Chunky Statement Vest
If you want instant gratification, go for a Super Bulky pattern – you can usually knit these in a weekend! They look modern and edgy.
- Open Trails Slipover, free pattern by Ashley Lillis
- Timbo Vest, free pattern by Gabriella Calderini
- See My Vest – Chunky yarn, free pattern by Emily Bolduan
- Heart Warming Vest, free pattern by Betsy Teitler
The Textured Cable Vest
If you’re feeling brave, try a vest with a single cable down the center. It adds a lot of “wow” factor without being as complicated as a full Aran sweater.
- Boogie Vest, free pattern by Amy King
- Simple cable vest, free pattern from A Box of Twine
- Forest Gem Vest, free pattern by DROPS design
Choosing the Best Yarn
The yarn you pick will change everything. Don’t just grab the prettiest color; look at the fiber content.
Wool Blends
Wool is the gold standard for vests. It’s “bouncy,” which means it holds its shape well. If you use 100% acrylic, the vest might start to sag or stretch out over time. A wool-acrylic blend is a great budget-friendly middle ground.
Cotton and Linen
Want a vest for spring or summer? Go with cotton. Just a heads up: cotton doesn’t stretch. It can be a little harder on your hands if you knit tightly.
What About Pilling?
Single-ply yarns (yarn that looks like one thick strand) are super soft but they pill like crazy. For a vest you’ll wear a lot, look for “plied” yarn (several strands twisted together). It’ll stay looking new much longer.
Pro Tips for Your First Vest
Do Not Skip the Gauge Swatch
We know, swatching is boring. But a vest needs to fit your body, not your chair, so knit a 4×4 inch square first. If you have more stitches than the pattern says, your vest will be too small. If you have fewer, it’ll be a tent. Adjust your needle size until you hit the mark.
Practice “Picking Up Stitches”
Most vests require you to pick up stitches around the armholes and neck to add a ribbed edge. This is the part that makes a vest look professional. Watch a few YouTube videos on this before you start. It’s easier than it looks!
This video by ChristaCoDesign shows you exactly how to pick up and knit around an armhole:
Block Your Finished Piece
Blocking is just soaking your finished vest in water and laying it flat to dry. It sounds simple, but it’s magic. It evens out your stitches and makes the edges lay flat. It’s the difference between “I made this in my basement” and “I bought this at a boutique.”
Measuring for the Perfect Fit
Don’t just guess your size. Grab a measuring tape!
- Bust: Measure around the fullest part.
- Length: Measure from your shoulder down to where you want the vest to end.
- Armhole: If you have a favorite tank top, measure the armhole opening. You want to make sure your knit version isn’t too tight under the arms.
Making it Your Own
The best part about free patterns is that they are a blank canvas.
- Change the length: Make it a crop top or a long tunic just by adding or subtracting rows.
- Add stripes: Use up your scrap yarn to make a colorful striped version.
- Mix textures: Use a fuzzy mohair yarn held together with a plain wool for a high-end, fluffy look.
Final Thoughts
Knitting a vest is one of the most rewarding projects you can take on. It’s the perfect bridge between “beginner” and “pro.” Whether you want something chunky and cozy for winter or a light cotton layer for the summer, there is a free pattern out there with your name on it. So, grab your needles, pick a yarn that makes you happy, and start casting on. You’ll be wearing your new favorite layer before you know it!
More knitting fun! 15 best free projects for gifting and destashing. Small triangular scarf knitting pattern.