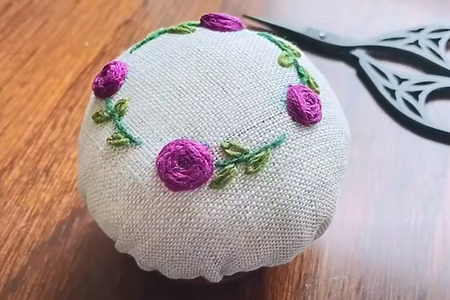
Learn how to make a cute and simple embroidered pincushion with this beginner-friendly tutorial! This quick project features a simple design with four little flowers and leaves, stitched using outline stitch, lazy daisy stitch, and woven wheel stitch. Pick pretty colors to make it your own! The pattern is circular – after embroidering, cut out the fabric and pull the threads of the running stitch along the edge to gather the fabric and form a round pincushion. Fill it with stuffing of your choice, then glue a round wooden base (or upcycle a small lid) to finish. It’s a simple and fun DIY embroidery project that takes very little time and makes a cute addition to your sewing supplies!
Looking for more DIY pincushion ideas? Try making a beautiful flower embroidered square pincushion with a free pattern for a personalized touch. Create a whimsical mushroom pincushion with this easy felt project for a fun and quirky design. Or, sew a folded corner pincushion with a simple tutorial for a practical sewing accessory!